minikube start --driver=none 환경으로 실행하기 위한 방법

driver=none 방식은 vm 같은곳에 설치하게되면 클러스터 접속을 위한 proxy가 필요없이 host의 IP로 바로 접근가능하여 k8s의 구조를 이해하는데 도움이 된다.

install minikube using docker, cri-dockerd on CentOS 9 stream

  • 2024-06-07 확인
    • runtime을 crio로 설치는 가능하지만 minikube addons enable시 오류 발생함
    • podman 설치하면 minikube start --driver=podman --force 실행가능함
      • 명령어를 minikube kubectl get po 이런식으로 하거나 alias kubectl="minikube kubectl --" 를 주면됨
        • 이 방식은 클러스터에 접근히기 위해서는 proxy 를 통해야함
    • crio를 설치하면 minikube start --driver=none --container-runtime=cri-o 시작가능함 ->

설치 순서

  • dnf update
  • install docker
  • install crio
  • install conntrack
  • install cri-dockerd
    • /etc/crictl.yaml 내용 확인
      • container rumtime 위치 확인 -> "runtime-endpoint: unix:///var/run/cri-dockerd.sock"
    • copy /etc/crio/crio.conf.d/10-crio.conf --> /etc/crio/crio.conf.d/02-crio.conf
  • install kubectl
  • install minikube
    • minikube start --driver=none --container-runtime=cri-o

update dnf

dnf update

install docker

sudo yum install -y yum-utils
sudo yum-config-manager --add-repo https://download.docker.com/linux/centos/docker-ce.repo

sudo yum install docker-ce docker-ce-cli containerd.io docker-buildx-plugin docker-compose-plugin

sudo systemctl start docker

install crio

curl https://raw.githubusercontent.com/cri-o/packaging/main/get | bash
systemctl status crio
systemctl start crio
crio status info
crictl info

yum install -y conntrack

cri-dockerd 설치

아래 2개 모두 download필요함
소스에는 cri-dockerd 파일이 없다.

wget https://github.com/Mirantis/cri-dockerd/releases/download/v0.3.14/cri-dockerd-0.3.14.amd64.tgz
wget https://github.com/Mirantis/cri-dockerd/archive/refs/tags/v0.3.14.tar.gz


tar -xvf cri-dockerd-0.3.14.amd64.tgz
install -o root -g root -m 0755 ./cri-dockerd/cri-dockerd /usr/local/bin/cri-dockerd
install -o root -g root -m 0755 ./cri-dockerd/cri-dockerd /usr/bin/cri-dockerd

tar -xvf v0.3.14.tar.gz
install ./cri-dockerd-0.3.14/packaging/systemd/* /etc/systemd/system

systemctl daemon-reload
systemctl status cri-docker
systemctl enable cri-docker.service
systemctl start cri-docker.service


# /etc/crio/crio.conf.d/10-crio.conf 파일 복사
cp /etc/crio/crio.conf.d/10-crio.conf /etc/crio/crio.conf.d/02-crio.conf

Install kubectl

curl -LO "https://dl.k8s.io/release/$(curl -L -s https://dl.k8s.io/release/stable.txt)/bin/linux/amd64/kubectl"

sudo install -o root -g root -m 0755 kubectl /usr/local/bin/kubectl

kubectl version

install minikube

curl -LO https://storage.googleapis.com/minikube/releases/latest/minikube-linux-amd64
sudo install minikube-linux-amd64 /usr/local/bin/minikube


minikube start --driver=none 
# minikube start --driver=none  --container-runtime=cri-o --force

정상 동작확인.

  • cri-dockerd 설치
    $ minikube profile list
    |----------|-----------|---------|--------------|------|---------|---------|-------|----------------|--------------------|
    | Profile  | VM Driver | Runtime |      IP      | Port | Version | Status  | Nodes | Active Profile | Active Kubecontext |
    |----------|-----------|---------|--------------|------|---------|---------|-------|----------------|--------------------|
    | minikube | none      | docker  | 10.30.147.175 | 8443 | v1.30.0 | Running |     1 | *              | *                  |
    |----------|-----------|---------|--------------|------|---------|---------|-------|----------------|--------------------|

troubleshooting

containerd 로 설정하는 방법 -> minikube에서는 안된다

sudo containerd config default | sudo tee /etc/containerd/config.toml
sudo systemctl restart containerd

runtime을 docker로 사용하는 경우

cri-dockerd 설치 필수
cni-plugin 필요 없음

runtime을 containerd, cri-o로 사용하는 경우

설치는 되지만, minikube addons enable 하면 아래 오류 발생함
Exiting due to MK_ADDON_ENABLE_PAUSED: enabled failed: check paused: list paused:

❌  Exiting due to MK_ADDON_ENABLE_PAUSED: enabled failed: check paused: list paused: crictl list: sudo -s eval "crictl ps -a --quiet --label io.kubernetes.pod.namespace=kube-system": exit status 127
stdout:

stderr:
/bin/bash: line 1: crictl: command not found

crictl 설치 오류

crictl 설치후 /etc/crictl.yaml 파일 생성 내용 추가 필요
cri-dockerd 설치후 cri-dockerd.sock 오류 나면
visudo의 default secure path 에 /usr/local/bin 추가 필요

설치시 오류 발생

이렇게 하면 minikube addons enable dashboard 에서 오류 발생함

  • install docker, conntrack, minikube
    • minikube start --driver=none
    • crictl 필요하다고 오류남. GUEST_MISSING_CONNTRACK -> conntrack은 설치했지만 오류가 난다?
    • cni plugin 설치후 crictl info에서 오류 보임 /etc/cni/net.d/에 파일이 없다고
    • minikube start --driver=none 하면 cri-docerd가 필요하다고 실행 실패
    • containerd 를 기본으로 설정하고, crictl.yaml에 runtime-endpoint: unix:///var/run/containerd/containerd.sock 설정하고 minikube start --driver=none --container-runtime=containerd 해도 -> crictl 없다고 오류 발생
    • install crio -> minikube start 헤도 같은 crictl 오류남
    • crictl.yaml 내용을 crio.sock으로 변경
    • minikube start --driver=none --container-runtime=cri-o -> 실행됨 addons enable 하면 오류남

instll cni-plugin

없어도 된다

CNI_PLUGIN_VERSION="<version_here>"
CNI_PLUGIN_VERSION="v1.5.0"

# change arch if not on amd64
CNI_PLUGIN_TAR="cni-plugins-linux-amd64-$CNI_PLUGIN_VERSION.tgz" 
CNI_PLUGIN_INSTALL_DIR="/opt/cni/bin"

curl -LO "https://github.com/containernetworking/plugins/releases/download/$CNI_PLUGIN_VERSION/$CNI_PLUGIN_TAR"
sudo mkdir -p "$CNI_PLUGIN_INSTALL_DIR"
sudo tar -xf "$CNI_PLUGIN_TAR" -C "$CNI_PLUGIN_INSTALL_DIR"
rm "$CNI_PLUGIN_TAR"

# 설치후 crictl info 하면 아래 오류 보임
  "lastCNILoadStatus": "cni config load failed: no network config found in /etc/cni/net.d: cni plugin not initialized: failed to load cni config",
  "lastCNILoadStatus.default": "cni config load failed: no network config found in /etc/cni/net.d: cni plugin not initialized: failed to load cni config"

'kubernetes' 카테고리의 다른 글

install containerd-based k8s using Ansible  (0) 2023.03.10
minikube on ubuntu  (0) 2020.04.17
POD 과 local machine 간 file copy  (0) 2020.03.13
ingress controller log  (0) 2020.02.13
Posted by jerymy
,
# yum upgrade in all node
yum -y upgrade


# ssh keygen in master
ssh-keygen -b 4096 -f ~/.ssh/mysshkey_rsa


# ssh key copy to worker1,2
ssh-copy-id -i ~/.ssh/mysshkey_rsa.pub root@worker1
ssh-copy-id -i ~/.ssh/mysshkey_rsa.pub root@worker2


# host명, hosts 파일 수정 -> 각 노드에서 수행
hostnamectl set-hostname master
hostnamectl set-hostname worker1
hostnamectl set-hostname worker2


# install ansible in master node
yum -y install epel-release 
yum -y install ansible

ansible --version


# edit ansible-hosts 파일수정 /etc/ansible/hosts
[masters]
control-plane ansible_host={MASTER IP} ansible_user=root

[workers]
worker1 ansible_host={WORDER1 IP} ansible_user=root
worker2 ansible_host={WORKER2 IP} ansible_user=root


# ansible 연결 확인
ansible all -m ping


# install-kube
ansible-playbook install-kube-v2.yml


# master-setup
ansible-playbook master-setup.yml


# worker-setup -> /etc/kube_join_command 파일 확인
ansible-playbook worker-setup.yml


install-kube-v2.yaml

---
- hosts: "masters, workers"
  remote_user: root
  become: yes
  become_method: sudo
  become_user: root
  gather_facts: yes
  connection: ssh

  tasks:
     - name: Stop and disable firewalld.
       service:
         name: firewalld
         state: stopped
         enabled: False       
  
     - name: disable SELinux
       shell: |
                sudo setenforce 0
                sudo sed -i 's/^SELINUX=enforcing$/SELINUX=permissive/' /etc/selinux/config

     - name: disabling swap as its required for kubelet
       shell: |
               sudo swapoff -a
               sudo sed -i '/ swap / s/^\(.*\)$/#\1/g' /etc/fstab
               sudo mount -a


     - name: Creating a configuration file for containerd, our container runtime
       shell: |
               cat <<EOF | sudo tee /etc/modules-load.d/k8s.conf
               overlay
               br_netfilter
               EOF

     - name: setting up pre-requisites for containerd
       shell: |
               sudo modprobe overlay
               sudo modprobe br_netfilter
     
     - name: sysctl params required by setup, params persist across reboots
       shell: |
               cat <<EOF | sudo tee /etc/sysctl.d/k8s.conf
               net.bridge.bridge-nf-call-iptables  = 1
               net.bridge.bridge-nf-call-ip6tables = 1
               net.ipv4.ip_forward                 = 1
               EOF


     - name: make settings applicable without restart
       command: sudo sysctl --system

# ipv4 강제로 설정
     - name: set proc/sys/net/ipv4/ip_forward
       shell: |
               sudo sysctl -w net.ipv4.ip_forward=1

     - name: installing containerd and settings its config. restart as well.
       shell: |
               sudo yum-config-manager     --add-repo     https://download.docker.com/linux/centos/docker-ce.repo
               sudo yum install -y containerd.io
               sudo mkdir -p /etc/containerd
               sudo containerd config default | sudo tee /etc/containerd/config.toml
               sudo systemctl restart containerd

     - name: Create a kube repo file
       file:
         path: "/etc/yum.repos.d/kubernetes.repo"
         state: "touch"

     - name: write repo information in kube repo file
       blockinfile:
         path: "/etc/yum.repos.d/kubernetes.repo"
         block: |
                [kubernetes]
                name=Kubernetes
                baseurl=https://packages.cloud.google.com/yum/repos/kubernetes-el7-x86_64
                enabled=1
                gpgcheck=1
                repo_gpgcheck=1
                gpgkey=https://packages.cloud.google.com/yum/doc/yum-key.gpg https://packages.cloud.google.com/yum/doc/rpm-package-key.gpg

     - name: install kubernetes
       shell: |
               sudo yum install -y kubelet kubeadm kubectl
               sudo systemctl enable --now kubelet
               sudo systemctl start kubelet


master-setup.yml

- hosts: masters
  become: yes
  tasks:
    - name: start the cluster
      shell: kubeadm init --pod-network-cidr=192.168.0.0/16
      args:
        chdir: $HOME
      async: 60
      poll: 60

    - name: create a new directory to hold kube conf
      # ansible.builtin.file:
      #   path: /etc/kubernetes
      #   state: directory
      #   mode: '0755'
    
      become: yes
      become_user: root
      file:
        path: $HOME/.kube
        state: directory
        mode: 0755

    - name: copy configuration file to the newly created dir
      # become: true
      # become_user: root
      # ansible.builtin.copy:
      #   src: /etc/kubernetes/admin.conf
      #   dest: $HOME/.kube/config
      #   remote_src: true
    
      copy:
        src: /etc/kubernetes/admin.conf
        dest: $HOME/.kube/config
        remote_src: yes
        owner: root

    - name: set kubeconfig file permissions
      file:
        path: $HOME/.kube/config 
        owner: "{{ ansible_effective_user_id }}"
        group: "{{ ansible_effective_group_id }}"
        
    - name: Apply a calico manifset to init the pod network
      # args:
      #   chdir: $HOME
      # ansible.builtin.command: kubectl apply -f https://docs.projectcalico.org/manifests/calico.yaml
    
      become: yes
      become_user: root
      shell: |
              curl https://raw.githubusercontent.com/projectcalico/calico/v3.24.5/manifests/calico.yaml -O
              kubectl apply -f calico.yaml 
      args:
        chdir: $HOME
        
    - name: Get the join command to be used by the worker
      become: yes
      become_user: root
      shell: kubeadm token create  --print-join-command
      register: kube_join_command

    - name: Save the join command to a local file
      become: yes
      local_action: copy content="{{ kube_join_command.stdout_lines[0] }}" dest="/etc/kube_join_command" mode=0777


Worker-setup.yaml

- hosts: workers
  become: yes
  gather_facts: yes

  tasks:
   - name: Fetch the join command we wrote to a file in previous step and move it to the worker node.
     become: yes
     copy:
       src: /etc/kube_join_command
       dest: /etc/kube_join_command
       mode: 0777

   - name: Join the Worker node to the cluster.
     become: yes
     command: sh /etc/kube_join_command


Trouble shoot

# 오류발생하면 kubeadm reset 하고 playbook 다시 실행.
kubeadm reset


# ipv4 에러 인 경우 master, worker 노드에서 아래 명령어 실행하고 kubelet 재시작하고 playbook 다시 실행하면 됨
modprobe br_netfilter
echo 1 > /proc/sys/net/ipv4/ip_forward


'kubernetes' 카테고리의 다른 글

Install minikube with Driver none and cri-dockerd on CentOS 9  (0) 2024.06.07
minikube on ubuntu  (0) 2020.04.17
POD 과 local machine 간 file copy  (0) 2020.03.13
ingress controller log  (0) 2020.02.13
Posted by jerymy
,

minikube on ubuntu

kubernetes 2020. 4. 17. 15:51

ubuntu 18.04에 minikube v1.9.2 설치(2020-04-19 기준)


Prerequisites : VM에 설치, 호스트 설치에 따라 달라짐

호스트 설치

  - docker가 설치되어 있어야함

  - --driver=none 옵션 


VM 설치는 root이외의 계정으로 실행해야 하며, 외부 접근을 위해서는 minikube start 시 proxy 설정이 필요함

여기서는 호스트 설치를 기준으로 진행함.


# kubectl 설치

# kubectl download
$ curl -LO https://storage.googleapis.com/kubernetes-release/release/`curl -s https://storage.googleapis.com/kubernetes-release/release/stable.txt`/bin/linux/amd64/kubectl

# Make the kubectl binary executable.
$ chmod +x ./kubectl

# Move the binary in to your PATH.
$ sudo mv ./kubectl /usr/local/bin/kubectl

# Test to ensure the version you installed is up-to-date:
$ kubectl version --client


# minikube 설치

# minikube binary download
curl -Lo minikube https://storage.googleapis.com/minikube/releases/latest/minikube-linux-amd64 \
  && chmod +x minikube

# Minikube 실행 파일을 사용자 실행 경로에 추가
$ sudo mkdir -p /usr/local/bin/
$ sudo install minikube /usr/local/bin/

# 최초 설치시 오류

$ minikube start --driver=none

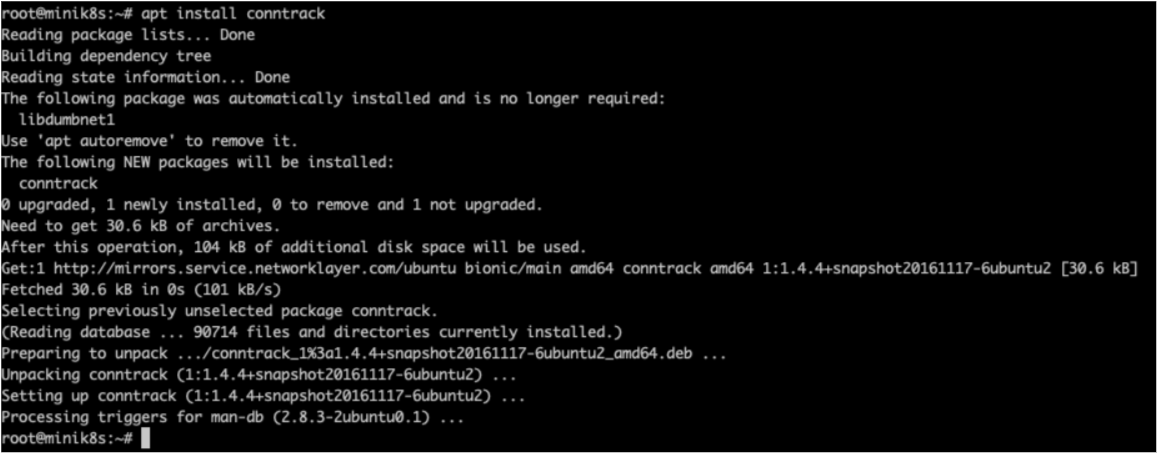
root path 설치를 위해서는 conntrack 가 필요하다는 메세지.

( Kubernetes v1.18.0 requires conntrack to be installed in root's path )

# conntrack 설치

$ sudo apt install conntract 


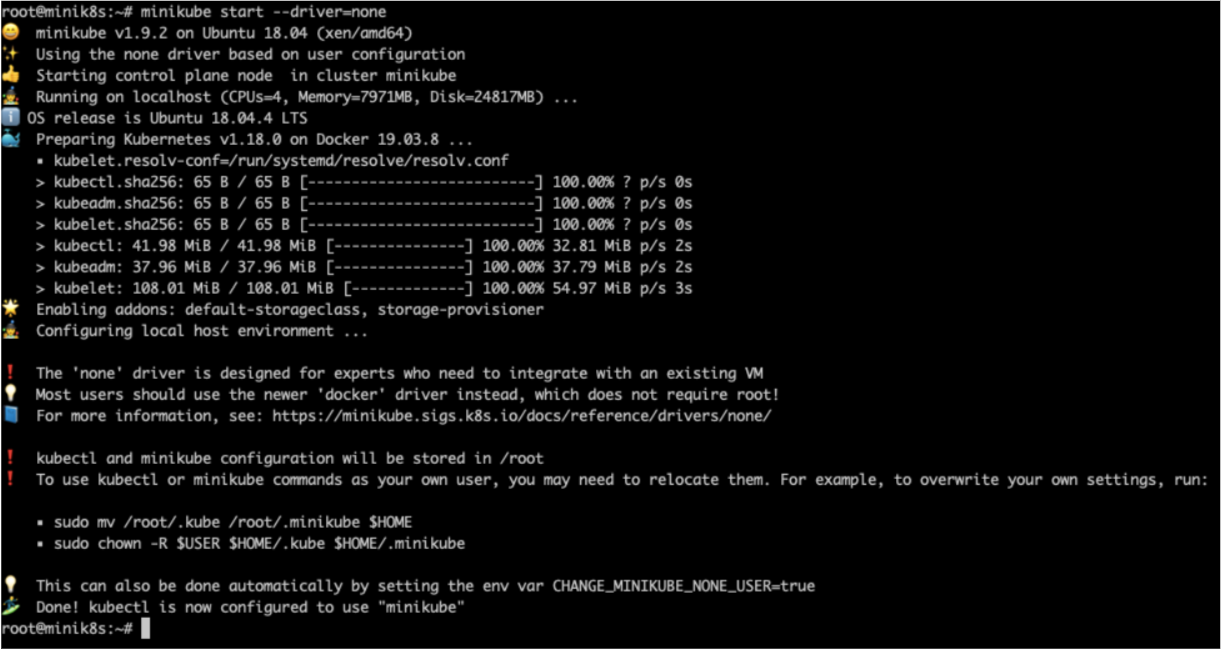
# minikube 설치

$ minikube start --driver=none

위와 같은 메세지 보이면 정상 설치된 것

이후로 minikube start만 입력하면 기존 driver=none 옵션으로 실행됨.


# dashboard 설치

$ minikube dashboard —url

처음 한번만 설치하면 이후로는 minikube start 되면 자동으로 실행됨.


# 외부에서 접근을 위해 proxy 실행

$ kubectl proxy --address='0.0.0.0' --disable-filter=true &

# dashboard 접속(VM_PUBLIC_IP는 본인의 IP로 변경)

http://{VM_PUBLIC_IP}:8001/api/v1/namespaces/kubernetes-dashboard/services/http:kubernetes-dashboard:/proxy/


# minikube 참고 사이트

https://minikube.sigs.k8s.io/docs/

Posted by jerymy
,

실행중인 pod 내부로 파일을 복사하거나 pod 내부의 파일을 로컬로 복사하는 방법


kubectl 명령을 실행하는 머신으로 POD 내부의 파일 copy

# POD에서 로컬로 file copy
$ kubectl cp namespaces/pod:dir/dir/mysql.cnf /dir/mysql.cnf

# sample 1
$ kubectl cp rm/rm-mysql-db-mysql-2342424324:etc/mysql/mysql.cnf.d/mysqld.cnf .
-> pod 안의 /etc/mysql/mysql.cnf.d 폴더의 mysqld.cnf 파일을 로컬 컴퓨터 . 디렉토리로 copy
-> windoww 경우 C드라이브 루트로 copy됨.

# sample 2
$ kubectl cp network-sdn/mysql-5c7f69846f-pmt8b:tmp/db-data.sql /root/ocp/db-data.sql
-> pod 이름 뒤에 : "/" 제외 해야 하며, local에 "."으로 하면 안되는 경우 있음 -> 전체 경로 표시 필요

# 로컬 file을 POD으로 copy
$ kubectl cp .filename namespaces/podname:directory/directory/filename.ccc 


'kubernetes' 카테고리의 다른 글

Install minikube with Driver none and cri-dockerd on CentOS 9  (0) 2024.06.07
install containerd-based k8s using Ansible  (0) 2023.03.10
minikube on ubuntu  (0) 2020.04.17
ingress controller log  (0) 2020.02.13
Posted by jerymy
,

ingress controller log

kubernetes 2020. 2. 13. 10:23

ingress controller log 확인


$ kubectl logs -f nginx-ingress-controller-XXXXX -n kube-system --tail=200


Posted by jerymy
,